Note: Your Access Level may restrict the use of some features.
Procedures can only be created on Desktop.
PDF's used in a Procedure are unavailable offline.
Procedures can be created by:
Creating a Procedure from a Template
- From the left menu, navigate to Documents > Procedures.
- Select Template Library to use a Safe Ag Systems Template, or Company Templates to use a Management Portal template. Not all sites will see Company Templates.
- Click the Title to review the Procedure, then Use Template.
- If needed, update the Title and add a Company Document ID
- To edit the Procedure before publishing, select Customise. To publish with no changes, select Publish. If selecting Publish, go to Step 8.

- Click the pencil
 to edit the Procedure. See Editor Formatting Options.
- Click Preview to review the Procedure before publishing.
- Use the phone, tablet or desktop icons
 to see how it'll appear on different screen sizes.
- Use the phone, tablet or desktop icons
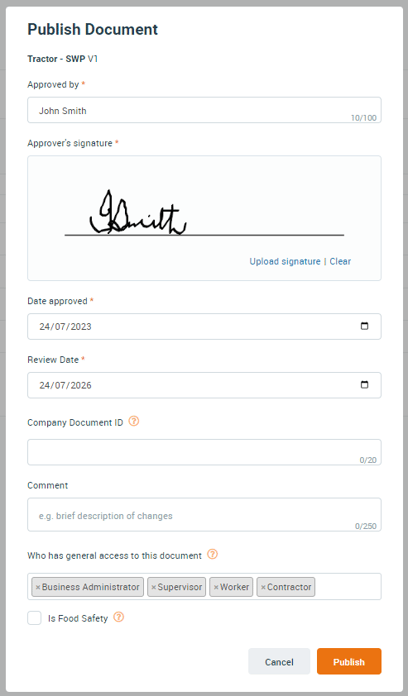
- Click Publish and complete the required fields.
- Set access to the Procedure by selecting Access Levels under Who has general access to this document. This will allow users with that Access Levels to see the Procedure, even if it's not assigned.
- Click Publish to make the Procedure live.
Building a New Procedure
- From the Left Menu navigate to Documents > Procedures.
- On the Published tab, select Build New.

- Add a Title and, if needed, a Company Document ID. Click Next.

- Drag and drop a Builder Element into the grey box in the centre of the screen.
- Use Editor to enable a free text field. See Editor Formatting Options.
- Use PDF to upload a PDF file. This will not be available offline.

- Click Preview to review the Procedure before publishing.
- Use the phone, tablet or desktop icons to see how it'll appear on different screen sizes.
- Use the phone, tablet or desktop icons
- Click Publish and complete the required fields.
- Set access to the Procedure by selecting Access Levels under Who has general access to this document. This will allow users with that Access Levels to see the Procedure, even if it's not assigned.
- Click Publish to make the Procedure live.
Editor Formatting Options
Formatting and content elements available in Procedures are:
-
- B - Bold text
- i - Italic text
- U - Underlined text
 - Text colour
 - Numbered list, bullet points or indent
- PPE - Add Personal Protective Equipment icons
 - Insert the Business Name saved under Business > Business Details > Primary Entity Name. This will update automatically if name changes are made.
 - Insert an image. Unavailable offline.
 - Insert a URL. Unavailable offline.
Return to: